** I apologize for this week’s square being late, and for the quality of the photos. I have managed to catch the flu, and haven’t been able to get off the couch in a few days. If there is any confusion in the pattern, or the photos don’t help enough, please leave a comment and I will try to explain it better. Thanks **
For the second week, I decided to complete a twist on the traditional granny square. This square is completed much in the same way as a traditional granny square, but the outcome is quite different. Here is the square that I completed:
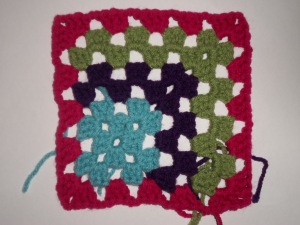
Week 2 Completed Square
The Pattern, With Tutorial Photos
I used a size H hook to complete this square. It measures 6 inches by 6 inches, as all squares will need to measure. Please select the appropriate size hook for your squares to measure 6 inches as well.
I used 4 colors (color A-D), so the pattern is written for 4 colors. If you use less colors, make the appropriate adjustments.
Abbreviations (for a tutorial of each stitch, see the links page in the menu):
ch – chain
sl st – slip stitch
dc – double crochet
To begin, ch 4 with color A. Join to first ch with a sl st.
Round 1: Continuing with color A, ch 3, 2 dc into loop. Ch 3 counts as the first dc in each round. *ch 2, dc 3 into loop* 3 times. Ch 2 and join with sl st to top of beginning ch 3.
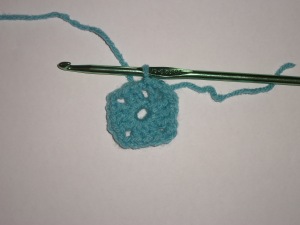
Round 1
Round 2: Continuing with color A, sl st in next 2 dc and sl st into corner ch-2 space. Ch 3, 2 dc into space, ch 2, 3 dc into same space (this creates the beginning corner). *(Ch 2, 3 dc, ch 2, 3 dc) into next ch-2 space* 3 times. Ch 2 and join with a sl st to the top of beginning ch 3. Cut yarn and finish off.
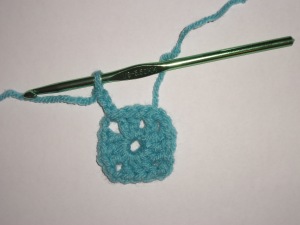
Round 2 – Beginning Sl Sts
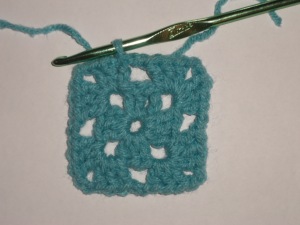
Round 2 Finished
Row 3: With color B, join with sl to to corner ch-2 space. Ch 3, 2 dc into corner ch-2 space. Ch 2, 3 dc in next ch-2 space, ch 2. In next corner ch-2 space, 3 dc, 2 ch, 3 dc. Ch 2, 3 dc in next ch-2 space, ch 2. In next corner ch-2 space, 3 dc only. Ch 3, turn.
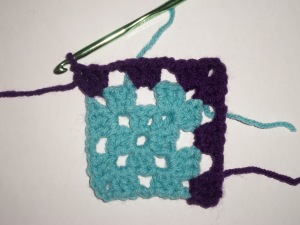
Row 3 Finished
Row 4: Continuing with color B, 3 dc in next ch-2 space. 2 ch, 3 dc in next ch-2 space, 2 ch. In next corner ch-2 space, 3 dc, 2 ch, 3 dc. ch 2, 3 dc in next ch-2 space, ch 2, 3 dc in next ch-2 space, 1 dc in last dc of previous row (the beginning ch-3 of that row). Cut yarn and finish off.
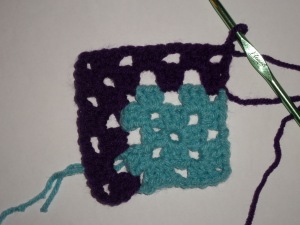
Row 4 Finished
Row 5: Turn. With color C, join with sl to to corner ch-2 space. Ch 3, 2 dc into corner ch-2 space. (Ch 2, 3 dc in next ch-2 space, ch 2) twice. In next corner ch-2 space, 3 dc, 2 ch, 3 dc. (Ch 2, 3 dc in next ch-2 space, ch 2) twice. In next corner ch-2 space, 3 dc only. Ch 3, turn.
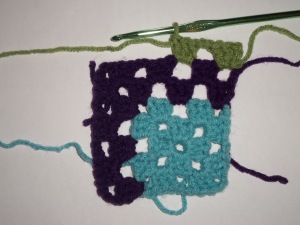
Row 5 – Beginning
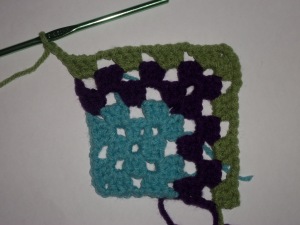
Row 5 – Finished
Row 6: Continuing with color C, 3 dc in next ch-2 space. (2 ch, 3 dc in next ch-2 space, 2 ch) twice. In next corner ch-2 space, 3 dc, 2 ch, 3 dc. (ch 2, 3 dc in next ch-2 space, ch 2) twice, 3 dc in next ch-2 space, 1 dc in last dc of previous row (the beginning ch-3 of that row). Cut yarn and finish off.
Row 6 – Finished
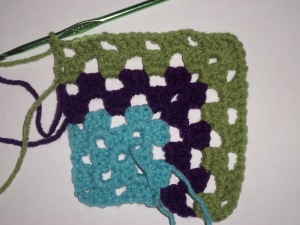
Round 7: Turn. With color D, join with sl to to corner ch-2 space. Ch 3, 2 dc into space, ch 2, 3 dc into same space (this creates the beginning corner). *(Ch 2, 3 dc in next ch-2 space, ch 2) 3 times. (Ch 2, 3 dc, ch 2, 3 dc) into next ch-2 space* twice.
Round 7 – Beginning
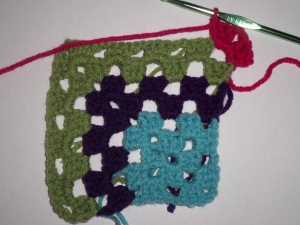
Now we will be working down the side of the square, along the ends of the previous rows. It should be obvious where to crochet the 3 dc clusters, as there are spaces for them and other clusters from the previous rows to skip.
(Ch 2, 3 dc in next ch-2 space, ch 2) 3 times. (Ch 2, 3 dc, ch 2, 3 dc) into next ch-2 space. (Ch 2, 3 dc in next ch-2 space, ch 2) 3 times. Join with sl st to the top of beginning ch 3. Cut yarn and finish off.
Finishing: Weave in all ends, making sure that they are very secure. You do not want the ends to come unraveled when you wash the blanket. If you need help with weaving in the ends, check out the tutorial posted in the links page above.
Feel free to send a photo of your finished square to littlebirdknits0@gmail.com to have it added to the photos page.

Sorry about you having the flu. I had it over Christmas and I wasn’t up for any crocheting and certainly not for taking pictures and posting instructions! Feel better soon and thanks bunches for the new square!
Love this square! Hope you feel better soon!!
Awwww…..hope you feel better very quickly.
Hope you soon feel better. I too have the flu and don’t know why I am trying to crochet. I am making so many mistakes, but feel restless at times so I pick up the hook and yarn.
Thank you for posting your square even though you are not well.
🙂
Hope you feel better soon.
Thanks for all your hard work.
Just want to hear: Can we Join the Squares as we go or do you have something else in mind?
If you want to join as you go, that is completely up to you. The current plan is for the last 4 weeks of the year to be devoted to layout, joining, and the final border. I plan on presenting several methods of joining, along with several blanket border, and each person can choose the join technique that they prefer.
One advantage to waiting to join is that you will be able to decide the final layout of all of the squares, instead of having to join them in order. But it is truly up to you.
I think I will then wait.
Think it make sense to me now.
Thanks.
I hope you’re feeling better! I just finished the first 2 squares and am looking forward to the next. 🙂
Pingback: 2013 Crochet Along Week 2
Row 4…. In next corner ch-2 space, 3 dc, 2 ch, 2 dc. Is the the 2 dc supposed to be 3??
Good catch! With all of the 3s and 2s, I was getting confused myself! I’ll update the pattern now 🙂