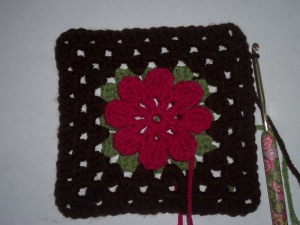
This week’s square is based on MaryEllen’s Easy Daisy Granny Square. Like the pattern title says, this square really is easy to make. After the flower, the square is just your typical granny square. Here is a photo of my completed square:

Week 19 Completed Square
The Pattern, With Tutorial Photos
I used a size H hook to complete this square. It measures 6 inches by 6 inches, as all squares will need to measure. Please select the appropriate size hook for your squares to measure 6 inches as well.
I used 3 colors (colors A-C), so the pattern is written for 3 colors. If you use more/less colors, make the appropriate adjustments.
Abbreviations (for a tutorial of each stitch, see the links page in the menu):
ch – chain
sl st – slip stitch
sc – single crochet
dc – double crochet
tc – treble crochet
To begin, ch 4 with color A. Join to first ch with a sl st.
Round 1: Continuing with color A, ch 1. (Sc, ch 4 into loop) 8 times. Join with sl st to first sc.

Round 1
Round 2: Continuing with color A, in next ch-4 sp, work *Sl st, ch 3, 2 tc, ch 3, sl st, ch 1.* Repeat from * to * 7 more times (in each ch-4 sp). Join with sl st to first sl st. Cut yarn and finish off.
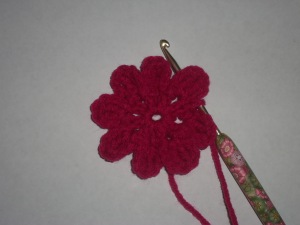
Round 2
Round 3: With color B, join with sl st in ch-1 space between any 2 petals, ch 1, sc. *Ch 4, sc in ch-1 space between next 2 petals.* Repeat from * to * 6 more times. Ch 4. Join with sl st to first sc. Push all of the petals to the front of the square.

Round 3 Back View

Round 3 Front View
Round 4: Continuing with color B, sl st into ch-4 sp. (Ch 3, 2 dc, ch 2, 3 dc) in the same ch-4 sp (corner made). *^3 dc in next ch-4 sp.^ (3 dc, ch 2, 3 dc) in next ch-4 sp (corner made).* Repeat from * to * 2 more times, then from ^ to ^ once more. Join with sl st to top of beginning ch-3. Cut yarn and finish off.

Round 4
Round 5: With color C, join with sl st in any corner ch-2 sp. (Ch 3, 2 dc, ch 2, 3 dc) in same ch-2 sp. *^3 dc in each space between the 3 dc groups of the round before to next corner ch-2 sp.^ (3 dc, ch 2, 3 dc) in corner ch-2 sp.* Repeat from * to * 2 more times, then from ^ to ^ once more. Join with sl st to top of beginning ch-3.

Round 5
Round 6: Continuing with color C, sl st in next 2 dc and into ch-2 sp. (Ch 3, 2 dc, ch 2, 3 dc) in same ch-2 sp. *^3 dc in each space between the 3 dc groups of the round before to next corner ch-2 sp.^ (3 dc, ch 2, 3 dc) in corner ch-2 sp.* Repeat from * to * 2 more times, then from ^ to ^ once more. Join with sl st to top of beginning ch-3.

Round 6
Round 7: Continuing with color C, sl st in next 2 dc and into ch-2 sp. (Ch 3, 2 dc, ch 2, 3 dc) in same ch-2 sp. *^3 dc in each space between the 3 dc groups of the round before to next corner ch-2 sp.^ (3 dc, ch 2, 3 dc) in corner ch-2 sp.* Repeat from * to * 2 more times, then from ^ to ^ once more. Join with sl st to top of beginning ch-3. Cut yarn and finish off.
Round 8
Finishing: Weave in all ends, making sure that they are very secure. You do not want the ends to come unraveled when you wash the blanket. If you need help with weaving in the ends, check out the tutorial posted in the links page above.
Feel free to send a photo of your finished square to littlebirdknits0@gmail.com to have it added to the photos page.
